Growing Alocasia From Corms: 5 Mistakes to Avoid (and How to Fix Them)
Are your Alocasia corms just sitting there, or turning soft before they sprout? You are not alone, and it usually comes down to five fixable things.
Quick answer: Growing Alocasia from corms comes down to five things: matching the growing medium to your routine, keeping it damp not soaking, leaving the corm alone to sprout, waiting for real roots before you pot up, and lowering humidity slowly. Get those right and most corms sprout and grow into healthy plants.
I have been growing Alocasia from corms for about five or six years now. In that time I have grown a lot of beautiful plants from corms, and I have also killed quite a few while I was figuring things out. So everything here comes from my own experience, not just from what the internet keeps repeating.
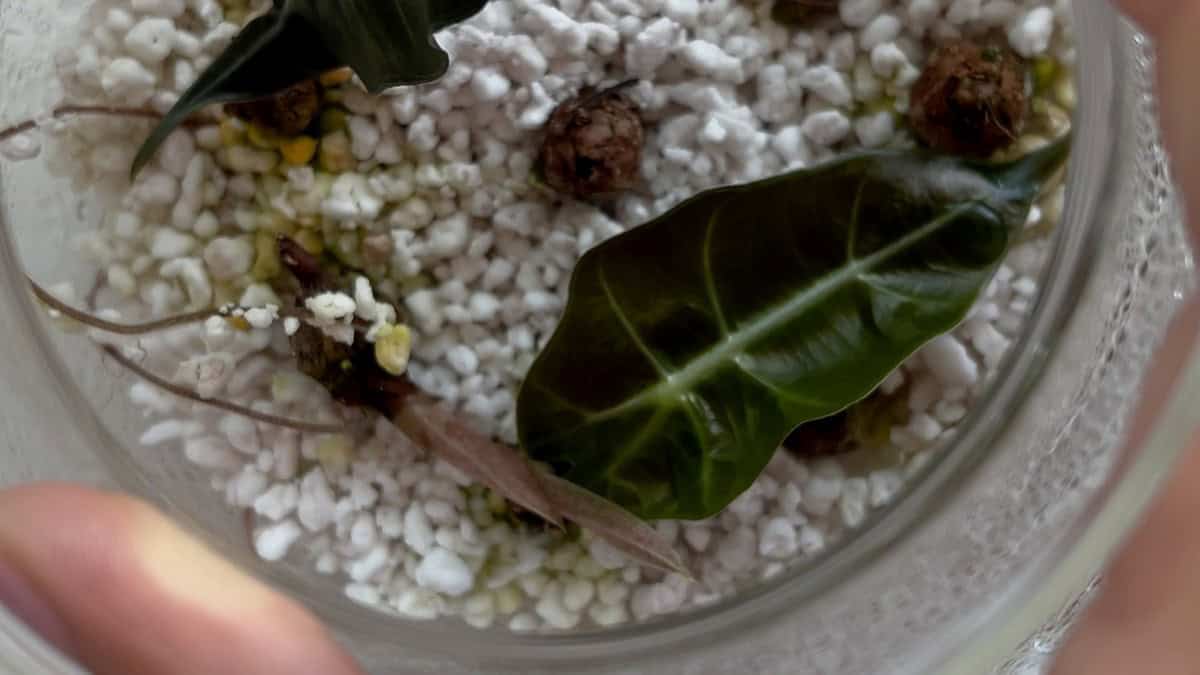
Here is a good example. In one box I have Dragon Scale corms that did sprout, but clearly something went wrong along the way. Right next to them I have five Amazonica corms that are healthy and growing really well. All of my Alocasias started from corms too. They may be different varieties, but they all need very similar conditions to get started, so the same mistakes can happen with any of them.
Let me show you the five biggest mistakes people usually make when growing Alocasia from corms, the same ones I made, and exactly how to fix them.
Where corms actually come from
Before we start, a quick word on what corms are. Corms are the little round growths that Alocasia produces underground, around the roots. When you repot a mature, healthy Alocasia, you may find a few of them hiding in there, and each one has the potential to grow into a whole new plant.
I have a full step-by-step video and guide showing that whole process, from taking the corms out to potting up the young plants. If you are not sure how to find and separate them yet, start there: how I find and separate Alocasia corms. Once you have your corms, come back here so you can avoid the five mistakes below.
| Mistake | Quick fix |
|---|---|
| Treating every growing medium the same | Pick soil, water, moss, LECA or perlite to match your routine, then adjust watering to that medium |
| Keeping the propagation box too soaking wet | Keep the medium damp, not saturated, and air the box out every couple of days |
| Overthinking which way is up and disturbing the corm | Growth point up if you can see it, on its side if not, then leave it warm and alone |
| Moving the young plant before the roots are ready | Wait for a small root system, around three leaves, not just the first leaf |
| Removing the humidity cover too quickly after potting up | Lower humidity gradually over a week or two, not all at once |
Mistake 1: Treating every growing medium the same
The first mistake is choosing a growing medium that does not really fit your routine. Alocasia corms can grow in soil, water, moss, LECA or perlite. All of these can work, so there is not one "best" medium for everyone.
The important part is choosing one you can manage easily. Water can work really well, but if you do not have time to check the level regularly, it may not be the easiest option for you. An open container can work too, but it dries out much faster, so you need to keep a closer eye on the moisture. So the mistake is not choosing water instead of perlite, or moss instead of soil. It is choosing a method that does not fit the way you actually care for your plants.
Soil is probably the most familiar option. You place the corm into a light, airy mix and let it grow there. The downside is that you cannot really see what is happening underneath, so you have to be careful with moisture. If the mix stays too wet for too long, the corm can soften and rot before you see any growth.
Water gives you the opposite experience. You can see the corm, watch the roots develop and know exactly what is happening. But you need to keep an eye on the water level and make sure too much of the corm is not sitting underwater all the time.
Moss is very good at holding moisture, which is why many people like it for propagation. This is also where you need to be careful. It can look fine on the surface while still holding a lot of water inside, so if you are not used to moss, it is easy to keep it wetter than the corm actually needs.
LECA can work well too, especially if you already grow in semi-hydro. It gives the roots plenty of air, but the moisture setup is different again, so you need to understand how high to keep the water and how much of the corm should stay in contact with it.
I usually grow mine in perlite, because for me it is the easiest one to control. It keeps the corm stable, holds enough moisture without staying too dense, and gives the new roots plenty of air. I can quickly see when it is drying out, and when the plant is ready to move it lifts out easily without disturbing those delicate new roots.
But that does not mean you have to use perlite. If soil works well for you, use soil. If you are comfortable with moss, water or LECA, those can work too. The important thing is to understand the medium you choose and adjust the moisture to that medium. Do not copy the same watering routine from one method to another and expect the same result.
Mistake 2: Keeping the propagation box too wet
The second mistake is keeping the propagation box too wet. When you are waiting for a corm to sprout, it is easy to think more moisture will help it grow faster. You cover the box, you see condensation on the walls, and because Alocasias love humidity, it feels like more must be better. But high humidity and a soaking wet medium are not the same thing.
You do want to keep the box covered, because that helps hold in warmth and humidity and stops the corms drying out too quickly. What you do not want is perlite that stays constantly saturated with water collecting at the bottom. The medium should stay damp, not soaking wet.
My Dragon Scale box is a good example of what happens when that balance goes too far. I left it closed and too wet for far too long. Most of the corms did sprout, so keeping them covered was not the problem. The problem was what happened after. Some of the new growth kept stretching until it reached the lid, the leaves became curled and pressed against the top, and there was a lot of moisture trapped around them with very little airflow. A few of the leaves are already soft and damaged, and some of the corms are starting to look mushy too.
So when you check your own box, do not automatically add more water just because you want the corms to sprout faster. Look at the whole container first. If there is already plenty of condensation on the walls and the perlite still looks damp, leave it alone. You do not need to mist again just because the very top looks a little dry. It is much safer to let the medium dry slightly than to keep adding water to a box that is already holding plenty.
Give the box a little fresh air from time to time, too. I usually open mine every couple of days just for a short while, then close it again. You do not need to leave the lid open for long. And while you are there, take a quick look at the corms. A little green algae on the perlite can happen in a warm, bright, humid box, and a small amount is usually not a problem. What you really want to watch for is a corm that starts becoming soft or mushy, visible mould, or a bad smell when you open the container. Those are the signs things are staying too wet. If a corm has already gone soft and smelly, that is root rot setting in, and it is better to remove that corm so it does not affect the others.
So yes, keep your corms warm and humid. Just remember that humidity does not mean you need to keep adding water. Keep the medium damp, not saturated, give the box a little fresh air, and let the corm do the rest.
Mistake 3: Overthinking the position and disturbing the corm
The third mistake is overthinking the corm too much: which way it should face, whether it is growing, and what is happening underneath.
Let us start with position, because that is one of the first things people worry about. Some corms have a very obvious growth point, so you can easily tell which side should face up. With others, especially the smaller ones, it can be really hard to tell. If you can see the growth point, place that side facing up. If you cannot, just place the corm on its side. The new shoot can usually find its way up on its own. I see this in my own plants too. Some of my Alocasias produced babies from corms I never removed or positioned, and they still came up perfectly well.
The bigger mistake is checking too much. Once the corm is planted, do not keep taking it out of the medium or digging around it to look for roots. Those first roots are very small and delicate, and you can easily damage them.
What helps much more is warmth and time. I keep mine around 75 degrees Fahrenheit, about 24 degrees Celsius, or a little warmer. If the room is cooler, they can take much longer to sprout. Light is less important before you see green growth, so I keep the box somewhere bright but away from strong direct sun. Once you see a green shoot or the first leaf, give the young plant plenty of bright, indirect light.
So if you know which way is up, place it that way. If you do not, put it on its side. Then leave it alone, keep it warm, and give it time.
Mistake 4: Moving them before the roots are ready
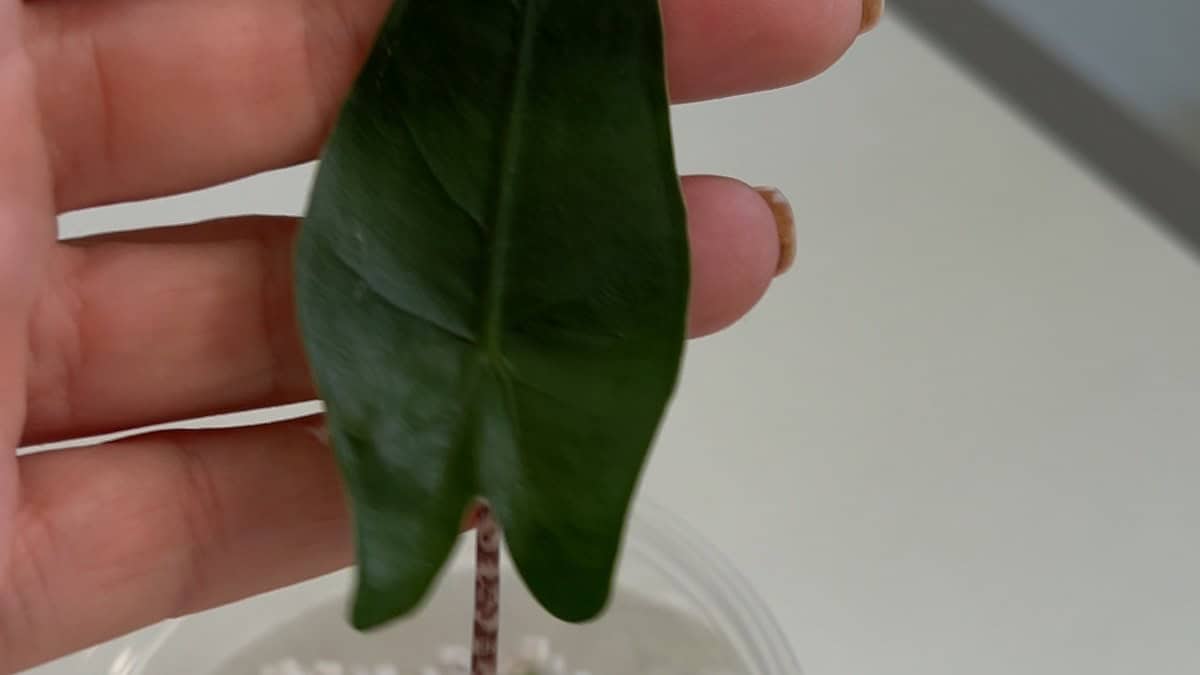
The fourth mistake is moving the young plant too soon. As soon as you see that first leaf, it already looks ready for its own pot. But underneath, the root system may still be very small and delicate. So before you move it, look at the roots, not just the leaves.
I usually wait until mine have around three leaves and a good amount of visible roots. Three leaves is not a strict rule. What matters more is that the roots are developed enough to handle the move.
When you do take it out, be gentle. Do not pull the plant out, wash the roots clean, or try to remove every little piece of medium. If some perlite stays attached, I leave it there. Just lift the plant carefully and disturb the roots as little as possible. Once it is ready, you can move it into more perlite or into a light, airy aroid potting mix.
The main thing is simple: do not decide the plant is ready just because you see a leaf. Let the roots tell you when it is time to move.
Mistake 5: Removing the cover too quickly
The fifth mistake happens after your corm has sprouted and you have moved the young plant into its own pot. At that point it is easy to think the difficult part is over. But there is one more change I would not rush.
Repotting itself is already a big change for such a young plant. You are moving it into a new container, sometimes into a different medium, and its delicate roots need time to settle in. That is why I keep the humidity the same for a little longer. The plant has spent its whole life in a warm, humid box, so I do not want to change everything at once.
If you repot it and then immediately remove the cover as well, the plant is dealing with two big changes at once. I have seen this with my own plants. Sometimes it looks like the repotting caused the problem, but the sudden drop in humidity can make things even harder. The plant was moved, the roots were disturbed, and at the same time it went from very high humidity to much drier room air. That can be a lot for such a small plant to handle all at once.
So after I pot up a young Alocasia, I keep it covered at first. That gives the roots time to settle into the new pot while the plant is still in the humidity it knows. After a few days I start opening the cover a little more, and over the next week or two I gradually leave it open for longer until the plant is ready to stay uncovered. Watch how the leaves respond, and if the plant looks stressed, give it a little more time. The goal is not to keep it covered forever, just to avoid making two big changes at once. Once it is uncovered, try to avoid very dry air. If your room is dry, I would rely more on a humidifier or a naturally humid room than on misting alone.
So after potting up, let the plant settle first, then slowly get it used to normal room conditions.
Watch the full walkthrough

If this helped, subscribe to the channel for more Alocasia care and propagation videos.
Wrapping up
Those are the five mistakes I would avoid when growing Alocasia from corms. Once you understand your growing medium, keep the moisture under control, give the corms warmth and time, and make each transition gradually, the whole process becomes much easier.
If you want to go deeper on Alocasia, my full Alocasia care guide covers light, water and feeding once your babies are growing, and if you are propagating other plants too, the houseplant propagation guide walks through every method. You might also like my notes on Alocasia Amazonica care and the most common Alocasia care problems.
Frequently asked questions
How long do Alocasia corms take to sprout?
It varies a lot. In a warm spot, around 75 degrees Fahrenheit or 24 degrees Celsius, many corms sprout within a few weeks, but some take a couple of months. Cooler rooms slow everything down. Warmth and patience matter far more than checking on them.
Why are my Alocasia corms not sprouting or going mushy?
The most common cause is a medium that stays too wet, which softens the corm before it can grow. Keep the medium damp, not soaking, air the box out every couple of days, and remove any corm that turns soft or smells bad so it does not affect the others.
Which way up do you plant an Alocasia corm?
If you can see the growth point, place that side facing up. If you cannot tell, just lay the corm on its side. The new shoot will usually find its own way up, so it is not worth stressing over.
Can you grow Alocasia corms in water?
Yes. Water lets you watch the roots develop, which is great for learning. Just keep an eye on the level and do not leave too much of the corm sitting underwater all the time. Water suits you if you can check it regularly.
When can I pot up an Alocasia corm?
Look at the roots, not just the leaves. I usually wait until there are around three leaves and a good amount of visible roots, then move it gently into perlite or a light aroid mix without washing the roots clean.
Written by Bojana
Plant lover, grower, and music maker behind Plant House & Garden, with 35+ years of hands-on houseplant experience. Read more about Bojana →