Root Rot: How to Save a Dying Plant (Step-by-Step Rescue)
If you have ever pulled a drooping plant out of its pot and found dark, mushy roots instead of firm white ones, you already know the sinking feeling. Root rot is one of the most common reasons houseplants die, and it often strikes the plants we love and water the most. The good news is that caught early, root rot is frequently fixable. I have saved more plants from it than I have lost, and in this guide I will walk you through exactly how I identify it, treat it, and keep it from coming back.
Let's start with what root rot actually is, because understanding the cause makes the fix make sense.
What Is Root Rot?
Root rot is the decay of a plant's roots, usually triggered by soil that stays too wet for too long. When roots sit in waterlogged soil, the tiny air pockets that let them breathe collapse. Roots need oxygen just as much as they need water, and once they are starved of it, the root cells begin to die. That dying tissue then becomes the perfect target for fungal and fungus-like pathogens already present in most soil, organisms such as Pythium, Phytophthora, Fusarium, and Rhizoctonia. They move in, feed on the weakened roots, and the rot spreads.
So while we often blame "overwatering," root rot is really a combination of two things: too little oxygen at the root zone, and the opportunistic pathogens that take advantage of it. That is why simply watering less is not always enough once rot has set in. You usually have to physically remove the damaged roots and reset the plant's environment.
What Causes Root Rot in Houseplants?
Most cases trace back to a handful of everyday mistakes. Knowing them helps you both treat the current problem and prevent the next one.
- Overwatering. The most common cause by far. Watering on a fixed schedule instead of checking the soil leads to roots sitting in moisture they cannot use.
- Pots without drainage holes. Without a way for excess water to escape, the bottom of the pot stays soggy, no matter how careful you are.
- Heavy, compacted soil. Dense mixes that hold water and squeeze out air keep roots wet and starved of oxygen. A light, airy aroid potting mix makes a real difference here.
- Pots that are too large. A big pot holds a large volume of wet soil that a small root system cannot drink fast enough, so it stays wet for days.
- Cold and low light. In winter, plants drink less and soil dries slower. The same watering routine that worked in summer can drown a plant in January.
Notice that nearly every cause comes back to the same thing: roots staying wet without enough air. Keep that in mind, because it is also the key to prevention.
Signs and Symptoms of Root Rot
Root rot is tricky because the damage happens underground, out of sight, and the early above-ground signs look a lot like underwatering. That is the cruel trap: your plant droops, you assume it is thirsty, you water it more, and you make the rot worse.
Here are the signs to watch for, roughly in the order they tend to appear:
- Wilting or drooping even though the soil is wet. This is the classic red flag. A thirsty plant perks up after watering. A rotting plant keeps drooping in damp soil.
- Yellowing leaves, often starting with the lower leaves and moving up.
- Soil that stays wet for many days after watering and does not seem to dry out.
- A sour, swampy, or rotten smell coming from the soil.
- Soft, mushy stems at the base of the plant.
- Stunted growth or a general loss of that healthy, glossy look.
The only way to know for sure is to check the roots themselves. Healthy roots are firm and white or light tan. Roots with rot are brown, gray, or black, and they feel soft and mushy. They may even slip off in your fingers with a gentle tug, and they often smell. Use this quick reference to read what you are seeing:
| What you see | What it likely means |
|---|---|
| Drooping even though the soil is still wet | Classic root rot, not thirst, so do not add more water |
| Lower leaves yellowing and moving up | Damaged roots can no longer feed the plant |
| Soil stays wet for many days after watering | Poor drainage or roots that have stopped drinking |
| Sour, swampy smell from the soil | Active rot and pathogens at work |
| Soft, mushy stem at the base | Rot has reached the crown, act fast |
| Brown, gray, or black mushy roots | Confirmed root rot, time to trim and repot |
If you want a clear yes or no answer fast, my Root Rot Rescue Kit includes a simple diagnosis flowchart that walks you through these exact checks step by step, along with a severity score so you know how far gone your plant is before you start. But you can absolutely diagnose it yourself with the checks above.
How to Treat Root Rot, Step by Step
Once you have confirmed root rot, act sooner rather than later. The earlier you treat it, the better your plant's chances. Here is the process I follow.
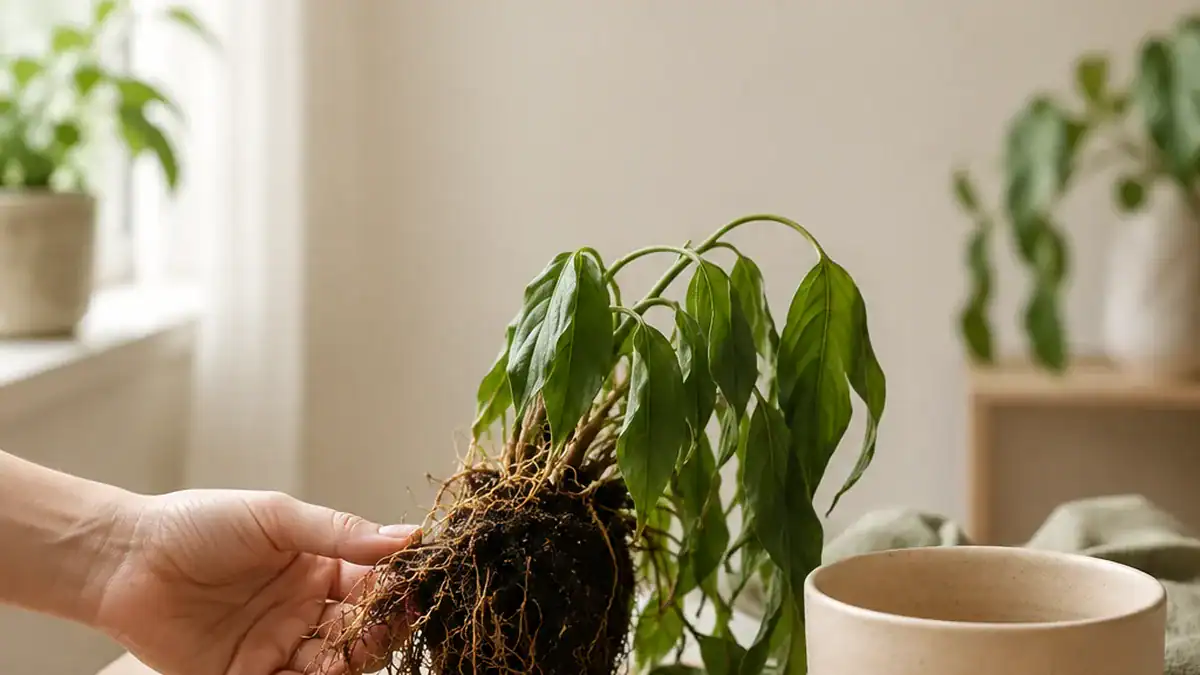
1. Unpot the plant and expose the roots
Gently slide the plant out of its pot. Remove as much of the wet soil as you can, then rinse the root ball under lukewarm water so you can clearly see which roots are healthy and which are rotted. Do this over a sink or outside, it gets messy.
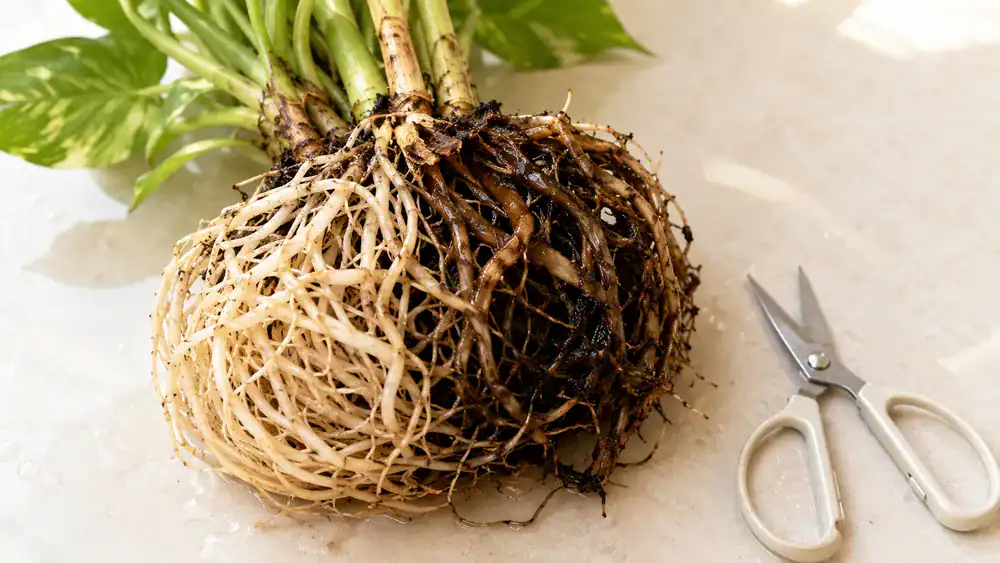
2. Trim away every rotted root
With clean, sterilized scissors or pruners, cut away all the brown, soft, or mushy roots. Keep only the firm, light-colored ones. Cut slightly into healthy tissue above each rotted section to make sure you remove the rot completely. Sterilizing your tools matters here, you do not want to spread pathogens, so wipe them with rubbing alcohol or a 10 percent bleach solution between cuts.
3. Optional, treat the remaining roots
This step is optional but can help. Two popular natural approaches:
- Hydrogen peroxide rinse. Mix one part 3 percent hydrogen peroxide with two parts water and briefly dip or swish the cleaned roots to disinfect them. The extra oxygen helps clear lingering pathogens.
- Cinnamon. Plain, non-flavored cinnamon is a gentle natural fungicide. Lightly dust the trimmed roots before repotting to discourage fungal regrowth.
Both are well-loved home remedies. Use one, not both, and do not overdo it.
4. Prune the top to match
If you removed a third or more of the roots, prune a similar share of the top growth, the leaves and stems. It feels harsh, but a reduced root system cannot support a full canopy. Lightening the load helps the plant focus its energy on recovery.
5. Repot in fresh, well-draining mix
Never reuse the old soggy soil, it is full of moisture and likely pathogens. Repot into fresh, airy, well-draining mix, adding perlite or bark to keep oxygen moving around the roots. Use a clean pot with drainage holes, and disinfect the old pot first if you are reusing it. Choose a pot that fits the now-smaller root system rather than a much larger one. If you want a mix that drains well and keeps oxygen at the roots, here is my airy, well-draining potting mix recipe.
6. Water carefully and wait
After repotting, do not water heavily. Let the plant settle for a few days, then water only when the top couple of inches of mix feel dry. Keep it in bright, indirect light, hold off on fertilizer while it recovers, and never let the pot sit in a tray of water.
Recovery is not always a straight line. A little more leaf drop in the first week is normal as the plant rebalances. Watching closely is half the battle, which is why I keep a simple recovery log for a few weeks, date, leaf color, new growth, and soil moisture, so I can actually see the trend instead of guessing. That tracker, along with a day-by-day 14-day recovery plan, is part of my Root Rot Rescue Kit if you want it all laid out for you.

When to Recover vs When to Propagate
Sometimes the roots are simply too far gone to save the whole plant. That is not a failure, and it does not have to mean losing the plant entirely. If any part of the stem is still firm and healthy, you can take a leaf or node cutting and propagate it in water or fresh mix, keeping your plant alive through a clone. I have rescued several special plants this way after the original was beyond saving. Think of it as a smart backup, not giving up. If you have a Pink Princess in trouble, I walk through this exact rescue in my Pink Princess propagation and root rot rescue guide.
Root Rot in Specific Plants
Some houseplants are especially prone to root rot because they like to dry out between waterings or hate sitting in soggy soil. If you are dealing with a particular plant, these guides go deeper into its specific quirks:
- Philodendron Pink Princess problems, one of the most common plants people search root rot help for
- Cyclamen problems, where the tuber rots easily in wet soil
- Ficus Elastica Tineke problems
- Schefflera problems
- snake plant root rot and dying leaves, a classic victim of overwatering
- ZZ Plant problems
- Alocasia problems
The diagnosis and treatment steps in this guide work for all of them. The plant-specific posts just add detail on watering and light for that particular plant. For the bigger picture of everything that can go wrong with a houseplant, from pests to yellow leaves, see my full houseplant pests and problems guide.
How to Prevent Root Rot
Treating root rot works, but preventing it is far easier on you and your plants. Almost all of prevention comes back to keeping roots moist but never waterlogged, with plenty of air.
- Water only when the soil tells you to. Check the top two inches of mix. If it is still damp, wait. Skip the fixed weekly schedule.
- Always use pots with drainage holes. This is non-negotiable for most houseplants.
- Use a light, well-draining mix. Add perlite or bark so oxygen reaches the roots.
- Empty drainage trays. Never let your plant stand in the water it just drained.
- Water less in winter. Growth slows and soil dries slower in the cooler, darker months.
- Do not reuse soggy soil from a sick plant, and check the roots of new plants before potting them.
- Keep tools and pots clean between plants to avoid spreading pathogens.
Do these consistently and root rot becomes a rare problem rather than a recurring heartbreak.
A Calm Approach to a Stressful Problem
Discovering root rot is stressful, especially with a plant you have grown for years. But take a breath. Most cases caught early respond well to the steps above: confirm it, trim the rot, refresh the soil, and water with more care going forward. Your plant may look bare for a while as it recovers, and that is okay. New roots and new growth are often quietly on the way.
If you would like the whole process laid out as a follow-along tool, a diagnosis flowchart, a severity check, a day-by-day 14-day recovery plan, a 4-week tracker, and a prevention checklist, that is exactly what I built my Root Rot Rescue Kit to be. It is the same step-by-step method from this guide in a printable form you can keep beside your plant while you work.
I also like calm background sound while I work on a plant. If you do too, my Root Rot Sound Therapy is a gentle, non-chemical audio session I made to play alongside good care. Think of it as ambiance for you and your plant, not a treatment.

That is a real root rot rescue in action on one of my own Pink Princess plants. If it helps, come subscribe on YouTube for more plant rescues and care.
Frequently Asked Questions
Can a plant fully recover from root rot?
Yes, many plants recover fully if root rot is caught early and treated properly. The key is acting before too many roots are lost, removing all the rotted tissue, repotting in fresh well-draining soil, and adjusting your watering. Severe cases where most roots are gone are harder, but you can often still save the plant by propagating a healthy cutting.
How do I know if it is root rot or underwatering?
The clearest test is the soil and the roots. If your plant is drooping but the soil is still wet, suspect root rot, not thirst. A thirsty plant perks up after watering, while a rotting one keeps struggling in damp soil. To confirm, check the roots: healthy roots are firm and white or tan, while rotted roots are brown or black, soft, and often smell sour.
Does hydrogen peroxide really treat root rot?
Hydrogen peroxide can help as part of treatment. A common mix is one part 3 percent hydrogen peroxide to two parts water, used to briefly disinfect cleaned roots or drench the soil. It releases oxygen that helps clear pathogens. It is not a magic cure on its own, though. You still need to trim the rotted roots, refresh the soil, and fix the watering habits that caused the rot.
How long does it take a plant to recover from root rot?
It varies by plant and how severe the rot was. Many plants stabilize within a couple of weeks and show new growth within a month or two. During recovery, hold off on fertilizer, water only when the top of the mix is dry, and watch for steady signs of improvement like firmer stems and fresh leaves.
Will root rot spread to my other plants?
The pathogens that cause root rot live in soil and can spread through shared tools, reused soil, and standing water. They will not jump through the air to a healthy plant, but you should sterilize your scissors and pots between plants, avoid reusing soil from a sick plant, and never let plants sit in shared drainage water.
Can I save a plant if most of the roots are rotted?
It is harder, but not always hopeless. Try the full treatment, trim aggressively back to any healthy tissue and repot. At the same time, take a healthy cutting and propagate it as a backup. That way, even if the original plant does not pull through, you keep it alive through a new clone.

Written by Bojana
Plant lover, grower, and music maker behind Plant House & Garden, with 35+ years of hands-on houseplant experience. Read more about Bojana →