Ponytail Palm Propagation: A Complete Step-by-Step Guide with Real Results
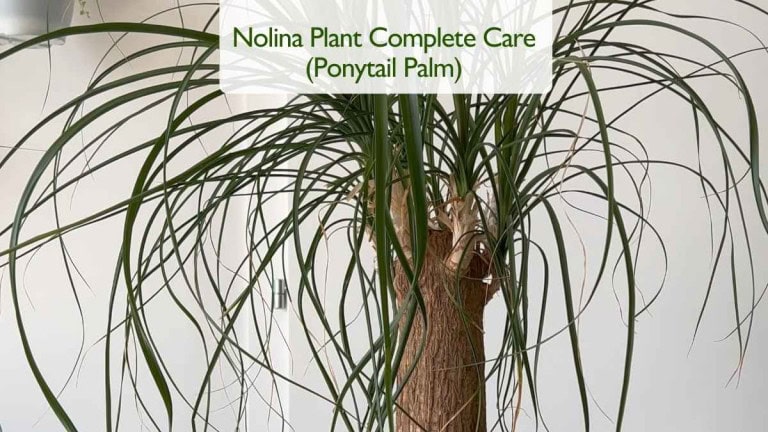
The ponytail palm (Beaucarnea recurvata), also known as Nolina or elephant’s foot tree, is famous for its sculptural trunk and cascading leaves. While most people grow it as a decorative houseplant, many plant lovers wonder if it can be multiplied. The answer is yes; with patience and the right techniques, ponytail palm propagation is possible and highly rewarding.
In this guide, I’ll show you the most effective ways to propagate ponytail palms, explain which methods work best at home, and share aftercare tips to ensure your new plants thrive.
🎥 For visuals and a step-by-step demonstration, watch my video below where I show ponytail palm propagation in action:
Click here to watch the video on YouTube
👉 If you’re new to this plant, also check out my Complete Nolina Plant Care Guide and Ponytail Palm Care Problems to avoid common mistakes.
Understanding Ponytail Palm Growth
Before diving into ponytail palm propagation, it helps to understand how the plant grows. Despite its name, this isn’t a true palm but a succulent-like plant from Mexico’s arid regions. Its swollen caudex (the bulbous base) stores water, allowing it to survive long dry periods.
This growth habit explains why propagation from seeds is slow and tricky, while pups (offsets) or division of trunks are more reliable methods.
1. Ponytail Palm Propagation from Seed
Yes, you can grow ponytail palms from seed, but be prepared for a very slow process. Seeds require warmth, consistent moisture, and bright light to germinate and even then, it may take weeks before you see sprouts. Seedlings grow slowly and can take years before resembling the mature plant.
✅ Tip: Use a shallow tray with cactus soil or a mix of sand and perlite, keeping it just slightly moist. Cover lightly with plastic to retain humidity until germination. Patience is essential, as ponytail palm propagation from seed is best suited for collectors or hobbyists who enjoy long-term projects.
2. Ponytail Palm Propagation by Division of the Trunk
If your ponytail palm has developed multiple trunks, you can propagate by carefully dividing them during repotting. Each trunk must have its own root system attached to survive independently.
This is one of the easiest ways to achieve ponytail palm propagation and usually results in healthy new plants. Just make sure to use sterilized tools and let the divided sections recover in well-draining soil.
✅ Extra Tip: After dividing, avoid watering for the first few days to allow the cuts to heal, reducing the risk of rot. Place the new plant in bright, indirect light and gradually resume watering.
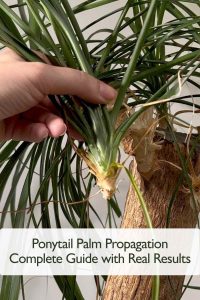
3. Ponytail Palm Propagation from Offsets (Pups) – My Experiment
The most common and practical method of ponytail palm propagation is through offsets, also known as pups. These small shoots grow at the base of mature plants and can eventually become independent plants of their own.
In my case, I had two broken pups that needed propagating. To test which method would work best, I used two different approaches side by side:
- First pup → Planted in pure perlite.
- Second pup → Planted in a mix of 50% cactus soil and 50% perlite, with rooting hormone applied.
Preparing the Offsets
To start, I used clean, sharp scissors to separate the pups. It’s important that the offset has a visible stem – if it’s too small, wait until it reaches at least 4 inches. You cannot propagate from just leaves.
I cut the pups close to the base to have enough material for propagation. Then, I removed the lower leaves to create a clean stem, which encourages root growth. Before planting, I allowed both pups to dry for one to two days so the wounds could callus. This step prevents rotting and is crucial for success.
Method 1: Rooting in Perlite
For the first pup in my ponytail palm propagation experiment, I chose pure perlite as the medium. Perlite provides excellent airflow and stability, similar to water propagation but with better protection against rot.
- Rinse the perlite before use, as dry perlite creates dust (wear a mask when handling).
- Fill a pot with damp perlite and make sure it has drainage holes.
- Insert the pup into the center and gently press it to secure.
When using this perlite method of ponytail palm propagation, it’s important to keep the medium lightly moist. Check it often, and water if the top feels dry. Roots usually form in one to two months. If mold develops, rinse or replace the perlite.
Method 2: Rooting in Soil Mix with Perlite and Hormone
For the second pup in my ponytail palm propagation experiment, I prepared a 50/50 blend of cactus soil and perlite. This mix ensures excellent drainage while still providing some organic matter and nutrients. I also dipped the cut end of the pup in rooting hormone to encourage faster root growth.
- Fill the pot with the cactus–perlite mix.
- Place the pup in the center and secure it.
- Water thoroughly and let all excess water drain out.
When using this method of ponytail palm propagation, it’s essential to always check the soil before watering again. If the top inch feels dry, water deeply until it drains completely. Never allow the plant to sit in water, as Ponytail Palms are highly prone to root rot.
Positioning and Light During Propagation
During my ponytail palm propagation experiment, I placed the perlite pup about 1.5 meters away from a southwest-facing window, where it received around 4 hours of direct sunlight daily. The soil-mix pup was kept on a west-facing window with about 5 hours of sun.
Both were positioned higher up, out of reach of my cats. While Ponytail Palms are non-toxic, their sharp leaves can be unpleasant if chewed, so it’s better to keep them away from pets. Read more about Pet-Friendly Housplants.
Watering Routine
During my ponytail palm propagation process, I watered both pups once per week, soaking the pots for about 15 minutes each time so the medium was evenly moist. After soaking, I allowed all excess water to drain out before placing them back in decorative pots.
As the temperature reached around 75°F and I kept the balcony door open for airflow, the soil started drying faster. This meant checking the medium more often and sometimes watering twice a week. Always remember: with Ponytail Palms, it’s better to underwater than overwater.
Results After 1.5 Months
After six weeks, both pups showed great progress. New leaves had started to grow, a clear sign that they were establishing roots. Some lower leaves dried out, which is normal for Ponytail Palms and can simply be trimmed away.
👉 Want to see the difference between the two methods? Watch my follow-up video below, where I show the real results of my ponytail palm propagation after 1.5 months. You’ll see root checks, growth progress, and exactly how each pup developed:
Click here to watch the video on YouTube
Pup in Soil Mix with Rooting Hormone
This pup developed an impressive root system. Roots were so strong they began emerging from the drainage holes. At this stage, it could be considered a new independent Ponytail Palm. Since it was already in soil, I kept it in the same pot for stability.
Pup in Perlite
The perlite-grown pup also rooted beautifully, producing clean, white roots. Even without rooting hormone, the root system was healthy and complete. At this stage, it was ready to be transferred into soil.
Transplanting the Perlite Pup
When moving the perlite-grown pup into soil, I used a mix of 80% cactus soil and 20% perlite. This balance ensures strong drainage while holding just enough moisture.
- Gently removed the pup from perlite.
- Washed the roots to make them more flexible and less prone to breaking.
- Placed soil at the base of the pot, positioned the plant, and filled around it.
- Pressed the soil lightly, avoiding compaction.
- Watered thoroughly using the soaking method, then drained out excess water.
I kept the pup in the same pot size to encourage stable root growth before moving to a larger container.
Aftercare and Fertilizing
After propagation, I avoided fertilizing for 5–6 months. Once the plants were fully established, I started feeding with diluted fertilizer, gradually increasing to half strength.
For a natural alternative, I recommend trying my homemade organic fertilizer.
Final Thoughts
My experiment with ponytail palm propagation proved that both methods – perlite and cactus soil with perlite – work successfully. The pup with rooting hormone grew roots faster, but the perlite pup caught up and produced healthy roots without any additives.
The keys to success are simple:
- Use a well-draining medium.
- Provide plenty of light.
- Water carefully.
- Be patient.
Both of my propagated pups are now thriving, with strong root systems and new growth. With the right approach, you can successfully propagate your own Ponytail Palm and enjoy more of these unique, sculptural plants in your home.
For more resources, don’t miss:
These guides cover everything from everyday care to troubleshooting issues, ensuring your new ponytail palms thrive for many years.
Explore More Music for Your Plants & Stay Connected!
Check out my Playlist: Music for Plants and find the perfect tunes to help your plants and yourself thrive.
Don’t forget to visit my YouTube Channel Plant House & Garden and subscribe — your support means the world to me!
Connect with me on social media for more plant care tips and music updates: Instagram | Facebook | X | Pinterest | Reddit | TikTok
Love plants? Love music? Don’t miss out on new updates — hit subscribe and follow now to keep your plants happy and your space vibrant!