How to Propagate Philodendron Pink Princess + Root Rot Rescue
Is your Philodendron Pink Princess showing signs of trouble like soft stems, drying leaves, or possible root rot? Don’t panic. This plant is sensitive, but with the right approach, you can save it and even grow new plants from what remains.
In this step-by-step guide, you’ll learn how to propagate Philodendron Pink Princess using stem cuttings. This method works beautifully for both struggling plants and completely healthy ones, making it the most effective way to rescue your plant or expand your collection.
👉 If you prefer visual instructions, you can also watch my full propagation video below, where I walk through every step in real time.

Click here to watch the video on YouTube
Why Propagate a Philodendron Pink Princess?
Pink Princess Propagation is useful in two cases:
✔ 1. Your PPP is struggling
Root rot, mushy stems, yellowing leaves, or dried foliage are common signs of overwatering or poor soil aeration. If rot reaches the root system, propagation is often the only way to save your plant.
✔ 2. Your plant is healthy and you want more cuttings
Pink Princess propagates beautifully from stem cuttings, and each cutting can become a new plant. Either way, this propagation method works perfectly.
If your plant is showing unusual symptoms, make sure to read my guide on the 5 most common Philodendron Pink Princess problems and how to fix them – it’s a great follow-up to this propagation tutorial.
My Pink Princess Story: Why I Had to Propagate Mine
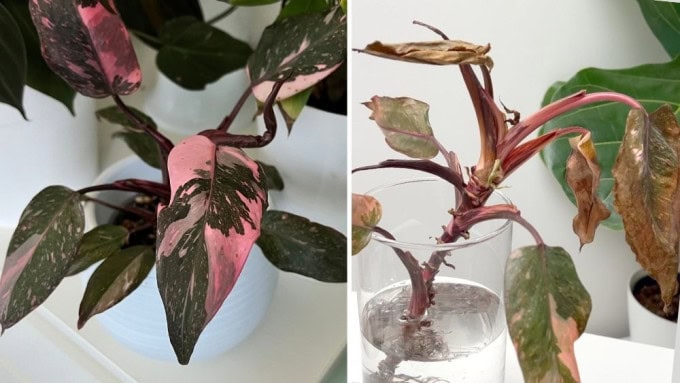
A few months ago, my Philodendron Pink Princess was growing beautifully – large leaves, vibrant pink variegation, and steady new growth. But after a repotting, I made a mistake many people make with this plant: I overwatered it.
Slowly, the signs of trouble appeared:
- the leaves began drying and curling,
- some petioles turned mushy,
- and the roots started to rot.
By the time I unpotted it, most of the root system was already gone. The foliage was completely dried, but the stem was still firm, and I could see several tiny new growth points. That was the moment I knew:
the only way to save this Philodendron Pink Princess was to propagate it from stem cuttings.
This struggling plant was originally propagated from my big, healthy “mother plant,” so I knew this method works beautifully and I could rescue it again.
👉 If you want to see how the mother plant looked two years ago and learn the full care routine, here’s the video:

Click here to watch the video on YouTube
What You’ll Need for Philodendron Pink Princess Propagation
To successfully propagate a Pink Princess, you only need a few simple tools and materials. Using clean, sharp equipment helps prevent rot, infection, and damage to the cuttings.
You will need:
- Sharp scissors or pruning shears – for making clean cuts
- Disinfectant (alcohol or diluted peroxide) – to sterilize your tools before cutting
- Sphagnum moss – ideal for rooting sensitive PPP stems
- A transparent container or propagation box – to maintain humidity and monitor moisture levels
- Filtered, distilled, or rainwater – gentle on vulnerable cuttings
- Cinnamon powder (optional) – natural antifungal protection for fresh cuts
This simple setup is all you need to root PPP cuttings successfully, whether you’re rescuing a damaged plant or propagating a healthy one.
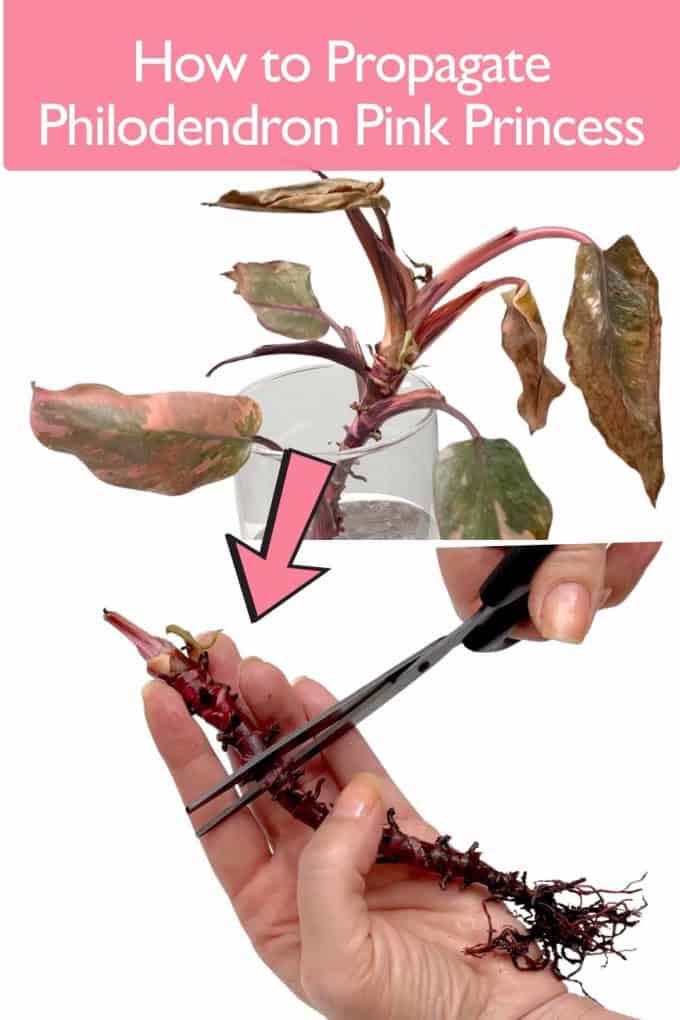
Preparing the Stem: Removing Roots, Leaves & Petioles
Before you begin propagating your Philodendron Pink Princess, the most important step is preparing the stem correctly. This is especially crucial if your Pink Princess is struggling with root rot, because rot can continue spreading even after propagation if the stem isn’t fully cleaned.
Start by removing all dried, mushy, or rotten roots. Damaged roots on a Philodendron Pink Princess are usually soft, brown or black, and break apart easily when touched. Trim away every unhealthy section until you reach firm, healthy tissue. Leaving even a small amount of rot can cause your cutting to fail, so this step is essential for a successful Pink Princess propagation.
Next, remove every leaf and petiole attached to the stem. A Philodendron Pink Princess cutting does not need leaves to root, and keeping them can actually slow down or ruin the propagation. Damaged leaves attract rot, petioles hold moisture and can mold, and clean stems root faster and more safely. Removing them frees the plant from “energy drain” and encourages the cutting to push out new growth points.
After cleaning the stem, inspect it carefully. Look for soft spots, dark patches, discolored areas, or anything that feels mushy. Any unhealthy section must be cut away until the stem is consistently green and firm. A clean, healthy stem is the foundation of a successful Pink Princess stem cutting.
As an optional final step, you can rinse the stem with a diluted hydrogen peroxide solution – one part 3% peroxide mixed with three parts water. This gentle dilution helps sterilize the stem, kills bacteria, and ensures that any traces of rot are removed before rooting.
What If Your Plant Is Healthy? (Propagation With Leaves)
If your Philodendron Pink Princess is healthy and you simply want to propagate it to create new plants, the process is even easier. Unlike rescue propagations, you can keep the leaves on your cutting – as long as each cutting has at least one healthy node.
To propagate a healthy Pink Princess, choose a section of the stem that has:
- a visible node
- a healthy leaf
- no signs of rot or damage
A cutting with a leaf will continue photosynthesizing, which gives it extra energy during rooting. This is especially helpful if you want faster growth or if you’re propagating Philodendron Pink Princess for aesthetic reasons.
Before cutting, make sure to remove only the lower leaves that would sit inside the moss or soil. Leaves that touch moisture tend to rot quickly, so keeping the lower part of the stem clean is important. The upper leaf or two can stay, they will not harm the rooting process as long as the node is exposed and stays in contact with the moss or substrate.
Healthy Pink Princess cuttings usually root faster and with fewer complications. Once placed into sphagnum moss, perlite, or a well-draining soil mix, they begin to develop new roots within a few weeks, especially if kept in bright light and stable humidity.
This method works beautifully if your goal is to multiply your Philodendron Pink Princess, share cuttings with friends, or grow a fuller, bushier plant.
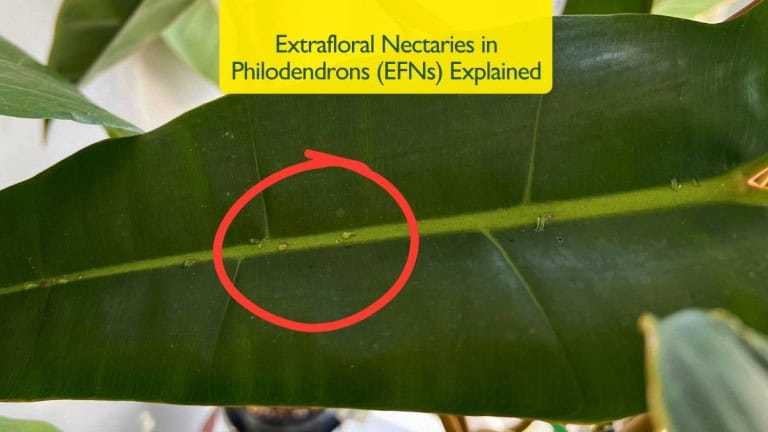
If you’ve ever seen sticky drops on your Pink Princess leaves, my article on extrafloral nectaries in philodendrons explains exactly what they are and why they appear.
Identifying the Nodes (The Most Important Step in Propagation)
Before you make any cuts, you need to understand where the nodes are – because every new root and every new leaf will grow from a node. Without a node, a cutting cannot root, and it cannot grow into a new plant. This is the most important part of learning how to propagate Philodendron Pink Princess successfully.
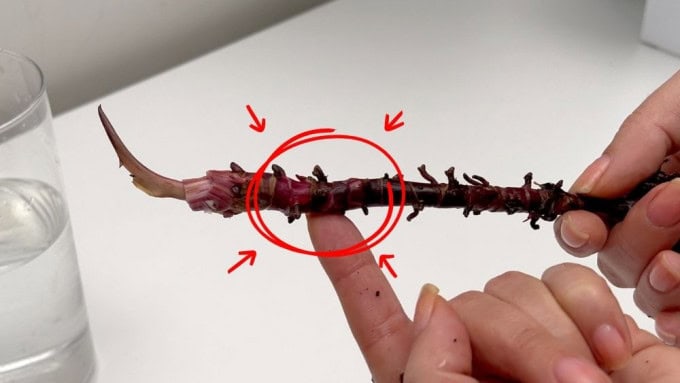
A node is the point on the stem where a leaf or petiole was previously attached. On a Pink Princess, it usually looks like:
- a small ring around the stem
- a horizontal line or bump
- a spot where aerial roots appear
If you notice small aerial roots, that’s an excellent sign – it means the cutting is likely to root faster once placed into sphagnum moss or soil.
Take your time to inspect the stem from top to bottom. You should clearly identify each node before cutting. When you propagate Philodendron Pink Princess, every cutting must have at least one healthy node. More than one node is great, but one is the minimum requirement for successful rooting.
If your plant is healthy and you’re propagating with leaves, make sure the node is located just below the leaf you want to keep. If you’re rescuing a damaged plant, simply choose the sections where the nodes look firm and unaffected by rot.
Correct node identification is what determines whether your propagation will succeed – so this step is worth doing slowly and carefully.
Making the Cuts: Philodendron Pink Princess Stem Cuttings
Once your stem is fully cleaned and your tools are disinfected, it’s time to make the actual cuts. This step is crucial, because proper cutting technique determines how well each section will root and grow. Whether you’re rescuing a damaged plant or propagating a healthy one, the process is the same — every cutting must include at least one healthy node.
Here’s how to cut your Philodendron Pink Princess stem cuttings correctly:
1. Start with the top cutting
The top section of the stem often has the newest growth. In your case, the top cutting contains three tiny new growth points, so keeping this piece slightly longer gives all of them a chance to develop.
Make a clean, straight cut just below a node.
A clean cut helps the stem heal quickly and prevents rot.
2. Continue with the middle section
Move down the stem and cut the next piece, again directly below a healthy node.
You’ll notice small aerial roots on some nodes – this is a great sign, because they help the cutting root faster in moss or soil.
Each new section should contain:
✔ one healthy node
✔ optional aerial roots
✔ firm, green tissue
Avoid using stem pieces without nodes – they cannot grow new roots or leaves.
4. Seal the cuts with cinnamon (optional but recommended)
Cinnamon is a natural antifungal and helps:
- protect the fresh cuts
- reduce moisture-related rot
- speed up the drying process
Simply dip each cut end lightly into cinnamon or sprinkle a small amount on top.
Why I Use Sphagnum Moss (and When to Use Soil Instead)

For Philodendron Pink Princess propagation, sphagnum moss is one of the safest and most reliable mediums – especially when you’re rescuing a plant from root rot. Pink Princess roots are thin and sensitive, and sphagnum moss creates the perfect balance of moisture and airflow, which helps the stem callus and form new roots without staying too wet.
Moss keeps the environment humid, but it also allows the stem to breathe. This reduces the risk of rot and gives you more control over moisture, which is important when working with damaged or delicate cuttings.
However, if your plant is healthy and you’re propagating simply to multiply it, you can root your Philodendron Pink Princess directly in a chunky soil mix. Healthy stems with leaves root well in soil, as long as the mix is airy, drains fast, and doesn’t stay soggy.
In short:
- Use sphagnum moss for rescue cuttings or sensitive stems.
- Use soil propagation for healthy cuttings with leaves.
Both methods work – but moss gives you more safety and control when rot is involved.
How to Prepare Sphagnum Moss for Pink Princess Propagation
Once your stem cuttings are ready, it’s time to prepare the sphagnum moss. Properly hydrated moss creates the ideal rooting environment for Philodendron Pink Princess propagation, giving the cuttings enough moisture without suffocating the stem.
1. Soak the moss
Place your dry sphagnum moss in a bowl and pour water over it. Let it sit for a minute or two so it can fully absorb the moisture.
2. Squeeze out the excess
Lift a handful of moss and squeeze firmly.
If water drips out, it’s too wet.
For Pink Princess cuttings – especially rescue cuttings – the moss should be moist, not wet. Overly wet moss can recreate the same problem you’re trying to fix: rot.
A good rule:
The moss should feel cool and damp, but never dripping.
3. Fill your container halfway
Place the prepared moss into a clean pot or transparent container.
Fill only the bottom one-third to one-half of the container – this gives the cuttings room to stand upright while keeping the humidity around the nodes.

4. Keep the moss fluffy
Spread the moss loosely.
Don’t press it down or compact it. Airflow is essential for root development, and tightly packed moss can suffocate new roots.
A transparent container is ideal because it helps you see when the moss is drying and allows you to monitor the root growth without disturbing the cuttings.
Placing the Cuttings Into the Sphagnum Moss
Once the moss is prepared, you can start placing your Philodendron Pink Princess cuttings into the container. Each cutting should be positioned upright, with the node resting gently on the surface of the moss. The node is the most important part of the cutting, and it only needs light contact with the moss to begin forming new roots. Avoid burying it too deeply, because Pink Princess cuttings root best when they have moisture below them and fresh air around the stem.
When setting the cuttings in place, press them into the moss just enough to keep them standing upright, but don’t force them down too far. The goal is stability, not full coverage. This helps prevent rot and gives the new roots room to grow freely. Make sure to leave space between each cutting so the air can circulate and the stems can dry between moisture cycles. Good spacing also makes it easier to monitor the growth points as they develop over the next few weeks.

Covering the Container (Humidity Dome Method)
After placing your Philodendron Pink Princess stem cuttings into the sphagnum moss, the next step is to create a warm, stable environment that helps them root quickly and safely. Lightly covering the container works as a simple humidity dome, which keeps the moss evenly moist and supports faster root development. You can use a loose lid, plastic wrap, or any cover that lets the humidity rise while still allowing some airflow.
The goal is not to seal the container completely. Pink Princess cuttings root best in high humidity, but they also need fresh air to prevent rot – especially if the propagation started as a root rot rescue. Leaving a small gap or simply placing the lid on top without snapping it shut creates the perfect balance. This keeps the stem hydrated, encourages new root growth along the node, and reduces the risk of mold inside the sphagnum moss.
If your container is fully airtight, make sure to open it once a day for a short period. This lets the trapped moisture escape and brings in fresh air. If you notice heavy condensation or water droplets forming on the sides, open it more often to improve ventilation. A stable high-humidity, low-moisture environment is exactly what helps Philodendron Pink Princess stem cuttings root safely and successfully.
Early Care – Watering, Light & Maintenance
Once your Philodendron Pink Princess cuttings are placed in the sphagnum moss and covered, the early care stage begins. This period is crucial for healthy root development, especially if you’re rescuing a plant from root rot. Because sphagnum moss holds moisture so well, you don’t need to water immediately after setting up the container. The moss should already be evenly moist – never soaking wet – so the cuttings can settle without being exposed to excess moisture.
If your cuttings came from a healthy plant, you can lightly mist the moss surface, but avoid spraying directly on the stem. For root-rot rescues, it’s best not to mist at all during the first few days. The stem needs time to callus and adjust to its new environment, and too much moisture too early can slow the healing process.

Place your propagation container in a bright, warm location, but avoid direct sunlight. Bright indirect light helps trigger new root growth without overheating the moss. In the following days and weeks, check the moss occasionally and mist only when the top layer begins to feel dry. Sphagnum moss should always stay slightly moist, not drenched and not bone dry – to support healthy root initiation.
Keeping moisture, humidity, and airflow in balance during this early stage is one of the most important steps to successfully propagate a Philodendron Pink Princess from stem cuttings.
What to Expect Over the Next Few Weeks
During the first few weeks of propagation, your Philodendron Pink Princess cuttings will slowly transition from healing to rooting. At first, not much will seem to happen on the outside. This is completely normal. Inside the stem, the cutting is forming a protective callus over the fresh cut, which is an essential step for preventing rot and preparing the tissue for new root development.
After this callusing stage, you’ll begin to notice subtle but exciting changes. Tiny white roots will start to appear along the node where the cutting touches the sphagnum moss. This process can take anywhere from two to six weeks, depending on temperature, humidity, and the overall health of the stem. Cuttings from healthy plants usually root a bit faster, while root-rot rescues may take longer as they recover.
Continue checking the moss periodically to make sure it remains lightly moist. Avoid disturbing or lifting the cuttings during this time – movement can damage new root tips. As long as the stem remains firm, the color stays healthy, and there’s no odor or mushiness, the propagation is progressing well.
Once the new roots reach about one to two inches long (2.5–5 cm), the Philodendron Pink Princess cuttings will be strong enough to transition into soil. At this stage, you’ll also see new growth points swelling or even unfurling baby leaves, which is a great sign that your propagation was successful.
If you enjoy propagation, you might also like my step-by-step experiment on propagating a Philodendron White Princess in water, with real results.
When to Pot Your Philodendron Pink Princess Cuttings
You’ll know your Philodendron Pink Princess cuttings are ready to move from sphagnum moss to soil once the new roots reach about one to two inches long (2.5–5 cm). At this stage, the roots are strong enough to handle the transition without breaking, and the cutting can begin absorbing nutrients from the soil. You may also see tiny growth points swelling or even a new leaf starting to form, which is a great sign that the propagation has taken successfully.
Once your new cuttings root successfully, check out my complete Philodendron Pink Princess care guide to help them grow strong and keep their variegation vibrant.
Final Thoughts
Propagating a Philodendron Pink Princess may look intimidating at first – especially if you’re dealing with root rot or a rapidly declining plant, but with the right steps, it’s a surprisingly reliable process. Stem cuttings give you the best chance at saving what’s left of a damaged plant, and they’re just as effective for multiplying a healthy one.
Related Articles
- Houseplants Watering Tips – 5 Mistakes to Avoid: How, When & How Much to Water
- The Truth About Misting Houseplants: Should You Do It or Not?
- Philodendron Birkin Problems: 5 Common Mistakes to Avoid
- Alocasia Propagation: How to Propagate Alocasia Regal Shield from Corms

Click here to watch the video on YouTube
Explore More Music for Your Plants & Stay Connected!
Check out my Playlist: Music for Plants and find the perfect tunes to help your plants and yourself thrive.
Don’t forget to visit my YouTube Channel Plant House & Garden and subscribe – your support means the world to me!
Connect with me on social media for more plant care tips and music updates: Instagram | Facebook | X | Pinterest | Reddit | TikTok
Love plants? Love music? Don’t miss out on new updates – hit subscribe and follow now to keep your plants happy and your space vibrant!