How to Propagate Alocasia Portodora from Stem Cuttings?
If you’re interested in learning how to propagate Alocasia, you’re in the right place! This guide will show you everything you need to know to propagate Alocasia plants using stem cuttings. I’ll walk you through each step, including setup, maintenance, and progress updates, so you can confidently grow new Alocasia plants at home. Although this demonstration focuses on Alocasia Portodora, this method applies to any Alocasia variety. For better visual instructions, you can watch the video where I explain and demonstrate all the steps and results:
Click here to watch the whole You Tube video!
Why I Decided to Propagate My Alocasia | How to propagate Alocasia
After having my Alocasia for nearly two years, it began struggling with a persistent spider mite infestation. Despite trying various treatments, the pests kept coming back, so I decided to start fresh by propagating new plants from stem cuttings. Here’s how it all began, plus everything I learned along the way to help you get successful results on how to propagate Alocasia on your own.
Preparing the Alocasia Stem Cuttings for Propagation
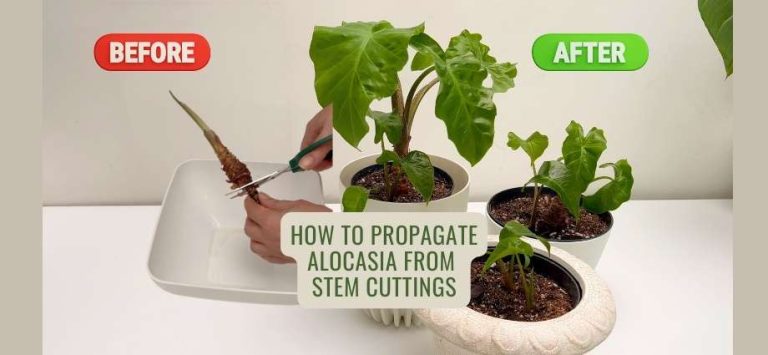
The first step in how to propagate Alocasia is gathering the right materials and preparing the plant. After cutting off all leaves and roots affected by spider mites, I was left with a healthy main stem and a new emerging leaf.
I gave the stem a thorough wash, applied insecticidal soap, and cleaned it with a solution of 3% hydrogen peroxide and water to ensure it was pest-free before propagation. Originally, I intended to plant the whole stem, but because of its length, I decided to cut it into three segments, creating the potential for multiple plants.

Using High-Humidity Containers for Alocasia Propagation
For the best results when propagating Alocasia, maintaining high humidity is essential. I placed two of the cut stem pieces in a plastic container with perlite, which I use regularly to propagate Alocasia corms. These containers help create a humid environment by trapping moisture, promoting healthy root growth.
Inside the container, I spray the perlite with distilled water whenever it starts to dry out. The box is kept in a bright spot, away from direct sunlight, to provide indirect light—ideal conditions for Alocasia propagation.
Planting Stem Cuttings in Perlite | How to Propagate Alocasia
For the third stem segment, I used a small, clear container with perlite. Transparent containers are ideal for propagation because they allow you to check moisture levels and observe root development without disturbing the plant. Perlite provides moisture without waterlogging, stabilizing the cutting better than water alone.
To keep this cutting healthy, I water it when the perlite becomes dry and place it in a bright area, near a northeast-facing window for indirect light.
Monitoring Growth and Results in the Process on How to Propagate Alocasia
After two weeks, I noticed new root growth and the new leaf unfurling—a promising sign! This positive response indicated that the cutting had adapted well. Consistent humidity and indirect light are crucial at this early stage to encourage healthy growth.
After about two months, I checked on the other two stems in the propagation container. Both cuttings had developed healthy new leaves and root growth. One even sprouted a corm, which is an exciting sign of a thriving Alocasia propagation.
Transferring Propagated Alocasia Plants to Soil
In the process of how to propagate Alocasia, it’s important to choose the right time to transfer new plants to soil. Once the roots have matured, gently remove the cuttings from perlite and place them in a well-draining soil mix. I recommend using a soil mix designed for aroids, which I prepare myself for all my Alocasias. This mix is chunky and well-aerated, providing the perfect environment for Alocasia roots to thrive. Below is a video explaining how I prepare the mix for all my aroid plants:
I always select smaller pots with drainage holes to help prevent root rot, as larger pots retain moisture for longer periods, which can lead to issues for Alocasias. Carefully place each cutting in its pot, adding soil without compacting it tightly.
Essential Successful Tips on How to propagate Alocasia
- Use Transparent Containers: Transparent containers let you monitor root growth and moisture levels without disturbing the plant.
- Choose High-Humidity Propagation: Humidity is key for how to propagate Alocasia effectively, especially in the early stages.
- Position in Indirect Light: Alocasia cuttings do best with indirect sunlight, which helps growth without scorching the delicate leaves.
- Regular Watering and Drainage: Water the plant when the top of the soil is dry and ensure the pot drains well to avoid overwatering.
- Avoid Fertilizing Right Away: Wait about six months before adding fertilizer to your propagated Alocasia. Once it establishes itself, use a diluted liquid fertilizer to encourage healthy growth.
Caring for Your New Alocasia Plants
After transferring your propagated Alocasia to soil, keep the plants in a bright, indirect light location, maintaining humidity above 60% if possible. Water the soil when the top two inches feel dry, but be careful not to overwater, as young Alocasia roots are sensitive and prone to rot.
Once the plant has adapted to its new environment, you can introduce a diluted liquid fertilizer during the growing season to encourage robust growth. However, avoid fertilizing in the initial six months to allow the plant to establish itself.
Final Thoughts
Alocasia plants are a rewarding addition to any indoor garden, and propagating them allows you to grow your collection or share these beautiful plants with others. By following these steps on how to propagate Alocasia, you’ll be able to successfully grow new plants from cuttings and enjoy their impressive, tropical foliage for years to come. If you’re interested in learning how to propagate Alocasia from corms, read more here.
Explore More Music for Your Plants & Stay Connected!
Check out my Playlist: Music for Plants and find the perfect tunes to help your plants and yourself thrive.
Don’t forget to visit my YouTube Channel Plant House & Garden and subscribe — your support means the world to me!
Connect with me on social media for more plant care tips and music updates: Instagram | Facebook | X | Pinterest | Reddit | TikTok
Love plants? Love music? Don’t miss out on new updates — hit subscribe and follow now to keep your plants happy and your space vibrant!

